Hello friends, welcome to our blog today we are going to look at a new tech topic called “Baloo Da Font Download” Do you need to follow some simple steps? All you have to do is click on the download button below and the Baloo Da Font will be downloaded.
আমাদের ব্লগ আজ আমরা “Baloo Da Font Free Download” নামে একটি নতুন প্রযুক্তি বিষয়ক বিষয় দেখতে যাচ্ছি। আমি আশা করি আপনি এই প্রযুক্তি নিবন্ধটি উপভোগ করবেন এবং পছন্দ করবেন এবং এটি দরকারী বলে মনে করবেন। আপনি যদি এই তথ্যটি দরকারী বলে মনে করেন, অনুগ্রহ করে নীচে মন্তব্য করুন এবং আমাদের জানান।
Baloo Da font download
আপনাদের বালু দা ইউনিকোড ফন্টটি স্টাইলিশ অক্ষরের লেখা কিছু ছবি দিচ্ছি তা দেখে আপনার এই ফন্ট ডাউনলোড করবেন কি না তা সিদ্ধান্ত নিতে পারিবেন।


Some details about this Baloo Da font
| Font Name : | Baloo Da (বালু দা) |
| Font Sub : | Regular |
| Font type : | OpenType Layout, Digitally Signed, TrueType Outlines |
| Version : | Version 1.00 |
| Font Unicode : | Yes |
| Download : | 6534 Times |
| Copyright by : |
How to install Baloo Da Font on your PC, Android, MAC?
যদিও বাংলা সিম্পল ফন্ট একটি ইউনিকোড ফন্ট যা টাইপ করা সহজ এবং আরও বেশি মানুষ তাদের কম্পিউটারে এই ধরনের ইউনিকোড ফন্ট ব্যবহার করতে পছন্দ করে।
1. Windows user
- Already BalooDa Font download
- Then Extract the zip file now show “.ttf“
- Two-time Right-click
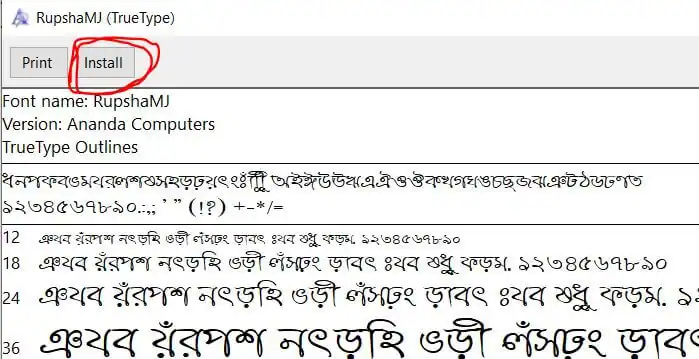
- Now New install windows popup (like the image)
- install Button Click here now your BalooDa Font is completed and installed.
- How to install Font on your Windows, Macbook, or Android

2.Android user
- Extract zip file now shows “BalooDa .ttf“
- আপনি আপনার মোবাইলে কোন এডিটিং অ্যাপ ব্যবহার করছেন তা আপনার উপর নির্ভর করে আমি দুটি জনপ্রিয় এডিটিং অ্যাপের নাম দেব 1.PicsArt 2.PixelLab এভাবে ব্যবহার করলে আপনি ফন্ট ইন্সটল করবেন।
1. PicsArt user
- First of all open File Manager –> Extract the font zip file open now shows “BalooDa .ttf“
- Long press on BalooDa .ttf –>Tap on Copy Button
- Now Search File Name PicsArt Open –> show Fonts file –> then Paste
- Now PicsArt App open –> My Fonts –> BalooDa show font name Font completed installed
2. PixelLab
- First of all open File Manager –> Extract the font zip file open now shows “BalooDa .ttf“
- Long press on BalooDa .ttf –> Tap on Copy Button
- Now Search File Name Fonts Open –> then Paste
- Now PixelLab App open –> My Fonts –> BalooDa show font name Font completed installed
3. Macbook User
- BalooDa Font Download
- Then Extract zip file now show “BalooDa .ttf“
- Two-time Right click
- Now the New install Windows popup
- Install Button Click here now you see the Font name BalooDa on the Font book completed installed.
